Introduction
Inbound leads are way better than outbound leads… as long as you can get in touch with them. Otherwise, they’re worthless. This guide will teach you how to easily get in touch with most or almost all of your inbound leads using the marketing automation sequence I developed for my clients. I am a big Zapier fan so you’ll get to see some of my “Zaps” and how they power our follow-up systems.
(By “inbound leads,” I mean people who contact your business with an interest in your products, services, or promotion. Inbound leads are typically easier to sell to than “outbound leads,” because people don’t like receiving cold calls or cold emails).
Have you ever generated tons of inbound leads, only to be frustrated that they won’t answer your phone calls?
One of my frustrations early on at Reputation Elevation was watching my clients get tons of leads… and then watch them fail to get hold of more than half of those sales opportunities.
I knew something had to change.
I went looking for a follow-up strategy that would make it easier for my clients to get in touch with prospects and make sales.
Today, my clients not only receive large volumes of inbound leads, but find it relatively easy to get in touch with them.
Even at Wealthpoint, the financial advisory that I am the Director of Marketing for, we were able to more than double the number of leads that we make contact with by phone. I say “Even at Wealthpoint” because most people aren’t used to doing business with a financial advisory they find on Facebook. It takes a smart strategy to get in touch before we’ve had a chance to show people what we do, how we do it, and why it will make a difference in their lives.
If my financial planning colleagues can get in touch with their leads, you can too! Let’s get started…
Quick Diversion: the Easiest Way to Collect Inbound Leads
Please forgive me for making a quick (but important) diversion.
This guide will help you follow up with inbound leads no matter where you generate them, but in case you’re curious, the easiest way to generate inbound leads is with Facebook lead form ads.
Lead form ads are easy to get results with because they make landing pages unnecessary. In the olden days (two years ago), you had to create a landing page that would get people to opt in for one of your reports. Like this one.
Many people struggled to build opt-in pages with high opt-in rates, reducing the efficacy of their Facebook Ads.
Facebook responded by introducing the lead form, which allows you to collect information without creating your own landing page. When you click a lead form ad, you see a form with some of your information already filled out (see example below).
.
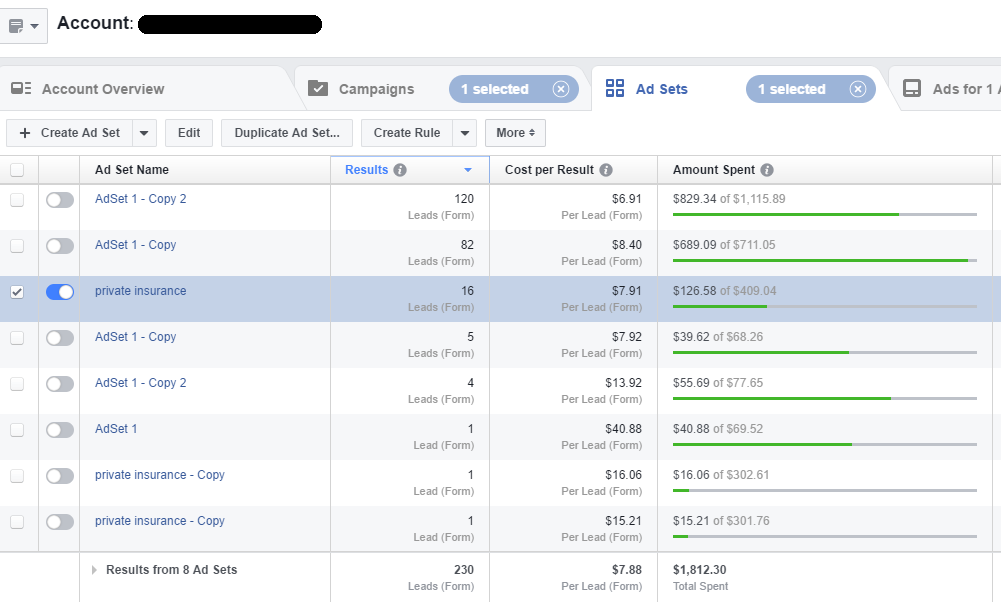
Lead form ads can provide consistent, affordable results. Here’s a screenshot from a campaign I am running for a client in which we are collecting free consultation leads:

As you can see, this campaign has generated 230 leads for an average of $7.88 each. These are all people submitting their name, email, and phone number to sign up for a free phone consultation with my client.
You’ll notice that there is some trial and error involved. One ad returned an appalling $40.88 cost for just one lead. Part of Facebook Ads is having the expectations that there are a few bad apples in every campaign. In fact, there are usually more bad apples than good ones. The trick is discarding the bad apples as quickly as possible. In this campaign, around $90 went to those “bad apples.” Over $1,700 went to the good apples.
The result? Between this campaign and several others, the client has generated over $180,000 in expected revenue from the new customers in just three months.
How’s that for a return on investment?
Of course, this client’s return on investment was only made possible by following a series of steps to ensure that as many leads as possible were spoken with on the phone.
So, let’s get jump right into the automated follow-up system.
Automated Follow-Up System Overview
When you get a lead who signed up to speak with you on the phone, or redeem an offer, here’s what should happen right away:
- If applicable, the lead should be redirected to a thank you page with a booking calendar just like this one. (I will discuss how to set up your booking calendar below.)
- The person in your business responsible for following up with your leads should get an automated alert by SMS or email with the lead’s contact information. (It is vital that you have a specific person dedicated to this task).
- The lead’s contact information should automatically be added to a spreadsheet or CRM so you can keep track of all of your leads.
- The lead should receive a friendly email confirming their submission and prompting them to make contact with you to redeem the offer or get on the phone with you, if they haven’t yet scheduled a time on their calendar
- The lead should receive an SMS message asking them to get in touch if they haven’t yet scheduled a time on your booking calendar
Now that I’ve given you a quick overview of the system, let me take you step-by-step through how to implement it.
Automation
This report is about the Automated follow-up system. There are different ways to automate the passing of data between apps in your marketing and sales stack, but my favorite is Zapier.
Zapier connects thousands of apps to each other using “zaps.” A zap is simply an automation that you can create without any programming background.
Below, you can see an example of a zap that I created:

I’m not going to get too involved sharing detailed directions about how to use Zapier simply because there is already a lot of helpful content online, and because Zapier has a very responsive support team. It’s more important to focus on the strategy than all the technical details.
Let’s review: from the perspective of your leads, what happens when they sign up for your offer by submitting their contact information is that they receive an SMS and an email.
Now, it could look a bit too automated when you receive an email and an SMS the very second that you sign up for an offer.
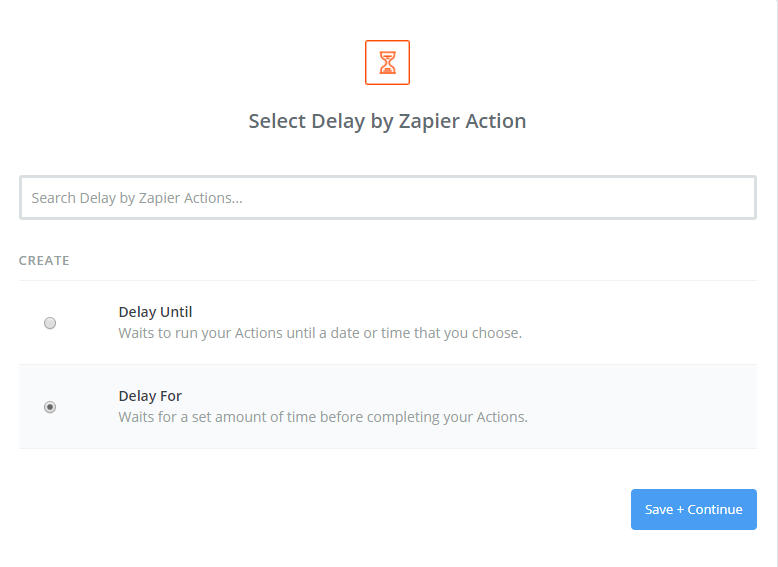
I haven’t seen any indications that this affects performance, but if you want to avoid the problem you can add a delay action between receiving the lead, sending them an SMS, and emailing them. Just select the “Delay by Zapier” action:

I recommend that your delay be no longer than 5 minutes. The faster you get to someone, the more likely you are to get them to take action. If you wait too long, they can lose some of the emotional excitement that your offer generated and be less likely to respond.
Sending SMS Messages
Most people don’t answer phone calls from numbers they don’t recognize. However, people do like to check their text messages. In fact, it is commonly reported that SMS messages have a 96% open rate.
There are a number of different apps that both work with Zapier,and send SMS messages.
Zapier actually has its own native sms app, but it will only send sms messages to one phone number – namely yours. It’s great for notifying you or your team, but not for contacting prospects.
In the example above, we used RingCentral to send SMS messages. We actually use RingCentral to manage our whole phone system.
Another option that is both user-friendly and very affordable is Textmagic.com. TextMagic is dedicated exclusively to SMS marketing and makes it easy to track conversations with your leads or prospects.
Sending alert messages to your salesperson is fairly straightforward. Use Zapier to automatically insert your lead’s email, name, and phone number into the text.
When sending SMS messages to your prospects, you want to make them as natural-sounding as possible.
Here is the template I recommend for getting your prospects to be in touch by phone:
Hi [FIRST NAME], this is [YOUR NAME] from [COMPANY]. Thanks for getting in touch on Facebook. Could we chat some time today or tomorrow?
Making Sure SMS Messages Only Go Out During Business Hours
You are likely to generate lots of leads outside of normal business hours. The last thing you want is a text message going out to your prospect at 11pm at night. It looks funny.
The good news is that with the right sequence of actions, Zapier can make your sms messages go out only during specific selected days and hours.
The bad news is that it’s complicated.
Let’s say that you want to send SMS messages Monday through Friday, from 9am to 5pm. You’ll need one zap (series of automation steps) that evaluates what day of the week it is, and what time of day it is, before sending off a text message through an app like Textmagic.
Then, you’ll need another zap for all leads which come in at night on any of the following days: Sunday, Monday, Tuesday, Wedesday, and Thursday. This zap gets programmed to fire the next day at a predetermined time (like 9am).
Next, you’ll need a zap for all leads which come in early in the morning, before business hours, on the following days: Monday, Tuesday, Wednesday, Thursday, and Friday. This zap gets programmed to delay the sms message until your predetermined time, on the same day.
Finally, you need a zap just for the weekend. Any time a lead comes in Friday night, Saturday, or Sunday, the sms message gets delayed until the next Monday.
Got it?
Don’t worry if you don’t. It takes a while to get the hang of.
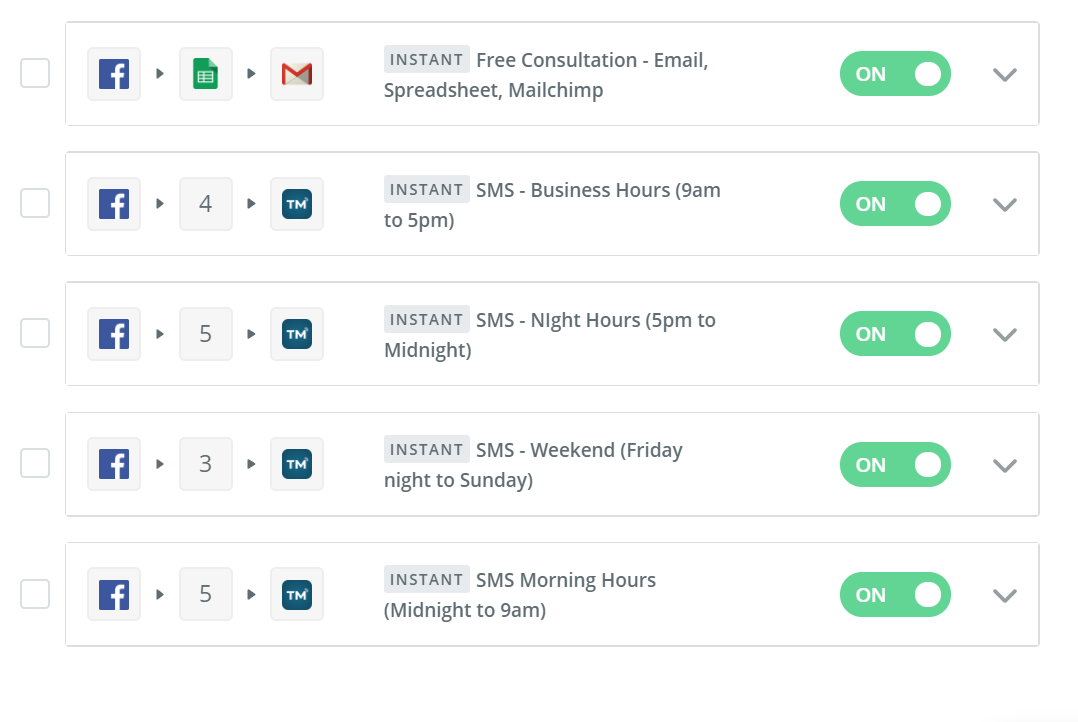
Here’s what my zaps look like for one client in the Zapier dashboard:

The first zap fires 24/7 and takes care of everything except sending sms messages. It adds leads to a spreadsheet and sends my client an email alert. When this client is ready, we’ll add in Mailchimp here too.
The next four zaps take care of either sending an sms message if it’s business hours, or delaying an sms message to the appropriate time.
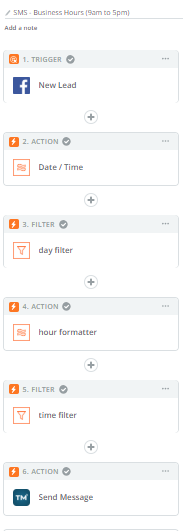
Let’s take a look inside the business hour zap so you can get an idea for how this works:

The first step in this Zap is the trigger step, which in this case is when a Facebook form lead is created.
When Facebook form leads are created, they have a “created time” in the UTC time zone. Action #2 transforms the “created time” from UTC to the time zone that you want (in this case, CST).
The next step (#3) is a filter action that filters by day. If the “created time” data includes Monday, Tuesday, Wednesday, Thursday, or Friday, the zap continues. If not, the filter stops the zap from running further, and no sms is sent.
Step #4 is an hour formatter. It takes the time output from step #2 and eliminates the minutes, seconds, date, and day from the time, leaving just the hour the lead was created, in the time zone of your choice.
Step #5 is a filter step that filters by time. If the created time hour is greater than 8, or less than 18, the filter goes through and an sms is sent by Textmagic. If the hour is before 8 or after 18, that means the lead came in before or after business hours, and the filter stops the zap from going any further. No sms is sent.
All of 4 of your zaps will run simultaneously any time a lead is created. However, only 1 of the 4 will actually fire, because of how we set up the filtering.
If you email your prospects the right way, you can achieve a decent email open rate… especially with the first email.
The key to getting your prospects to open an email is to be as natural as possible.
The more the email feels like it was typed by hand, the more likely it is to be read and responded to.
In fact, I often recommend to my clients that they use the simplest possible email template they can find.
Here is an example email text that you can use to send to your prospects:
Subject:
Hi {First Name}
Message:
Hi {First Name},
Thanks for getting in touch about (thing they got in touch about). If you didn’t have a chance to choose a time on our booking calendar, you can do so now: {link}
Calendar slots can go pretty quickly, so be sure to sign up before someone else takes the time that you prefer.
I look forward to being in touch!
{Email Signature}
Again, the key is to make your email as simple and natural as possible. You just want people to open the email and take the action you desire.
Start sending marketing emails to your leads one day after they sign up for your offer by creating autoresponders. Your autoresponders might point them to content you have online, use sales copy to get them excited about your services, show them your testimonials, or give them tips and advice. I usually like to send the first week’s emails once daily, and then taper off to once every two days so as not to bug people.
Here’s an example of an email sequence by topic:
- Confirmation email with calendar link
- Case Study
- Email featuring a personal story that inspired you or taught you something that you apply to your business
- Case Study
- The Secret to XYZ
- Case Study
- What ABC Don’t Want You To Know About XYZ
- Case Study
Try to create a personal connection with each prospect via email by writing naturally, telling stories about your past, revealing little bits here and there about your personality, and providing value.
Using Retargeting Ads to Support Your Sales Process
One of my favorite revenue-boosting tools is retargeting. The first time I helped a client generate 6-figure results, it was by adding retargeting to his e-commerce website.
Retargeting is a great way to put content in front of your leads. The more times you make contact with and give value to your prospects, the more likely they are to buy from you.
Promoting a sequence of videos, blog posts, or other materials can go a long way towards keeping people invested in your sales process and more responsive to your efforts.
I usually rely on Facebook for retargeting. If you are collecting leads from your website, you’ll need to add the Facebook pixel to the header of every page on your website. Then, you can create a custom audience in Facebook that consists of people who visited the thank you page that people are redirected to after becoming your lead.
If you are using form ads, you can create a custom audience out of people who submitted their information via your form. (You can also retarget people who opened your form but didn’t submit it, in order to get them to convert.)
Clever retargeting keeps you front of mind with your leads, enhances your image, and gives them the sense that you’re everywhere they go.
How to Create a Retargeting Sequence
It’s very tempting to create one retargeting audience consisting of everybody who visited your website in the last 30, 60, or 90 days. The problem is that after 30 days, everyone is tired of seeing the same old retargeting ad from you.
The way to fix this problem is to create multiple retargeting audiences, which vary in length of time since they visited your website.
Here’s what that might look like in your list of Facebook custom audiences…

Now, when you create your retargeting ad sets in Facebook Ads, you’ll actually create three separate ad sets. One includes only those people who have visited in the last 14 days.
The second includes the audience of people who visited within 30 days, but excludes the audience of people who have visited within 14 days. That way, you can deliver a different creative to someone who hasn’t visited in more than 14 days, than what you are showing to people who have.
Finally, you create at third retargeting ad set and include your 60-day audience, but exclude your 30-day audience. Now, you can move people who haven’t been to the website in 1 month to a different creative.
Of course, you can go much further and create different audiences week by week, creating five, six, seven, or or more separate ad sets with different retargeting creatives.
Conclusion
Well, I hope that gives you some good ideas for your marketing project. How do you use marketing automation in your business? Comment below…


